

This section expands on the technical architecture and implementation behind my recent Zero Trust case study: How I Delivered Zero Trust Security for a Client’s Legacy PHP System — Without Rewrites, Downtime, or Big Costs, and extend the part 1 story to the internet‑facing Zero Trust layer, covering how external traffic is authenticated, filtered, and isolated before it ever reaches the private network.
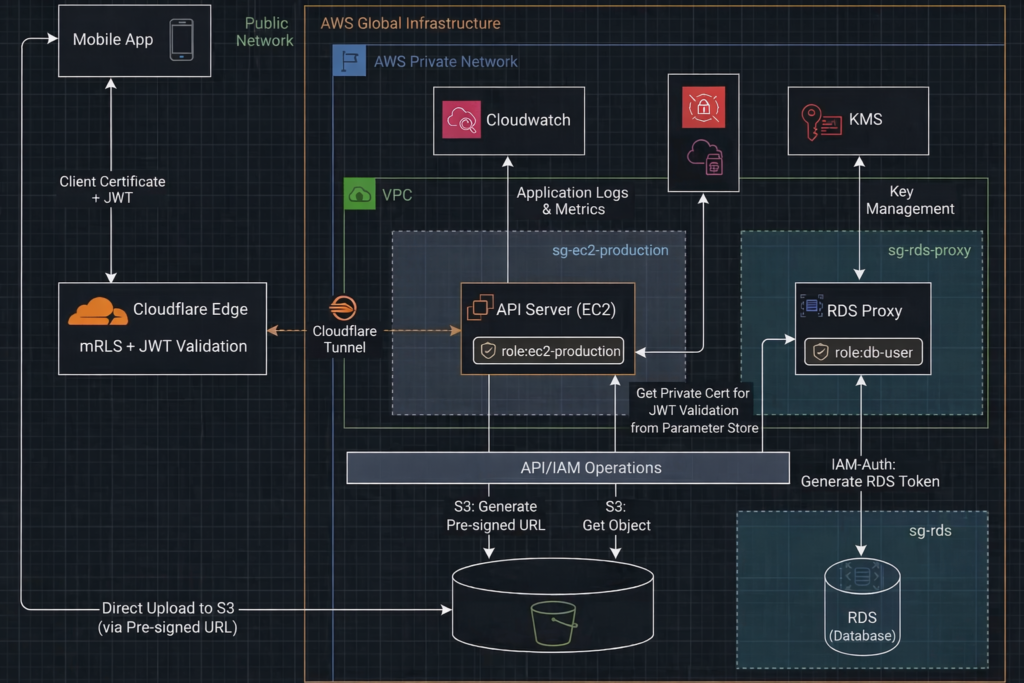
Below is the high‑level architecture diagram:
API Server — Nginx Layer
The Nginx layer enforces strict request‑level security controls before traffic ever reaches PHP. It blocks unsafe request patterns, rejects malformed uploads, prevents host‑header spoofing, and adds essential security headers. Sensitive files, hidden paths, and directory traversal attempts are denied outright. The server also hides all version information and limits request size to reduce attack surface. Together, these rules create a hardened perimeter that filters out malicious traffic and ensures only clean, intentional API requests reach the application.
Nginx Configuration Snippet
//  other settings

autoindex off;

# Block direct IP access
if ($host != "yourdomain.com") {
	return 444;
}

# Security headers
add_header X-Frame-Options "SAMEORIGIN" always;
add_header X-XSS-Protection "1; mode=block" always;
add_header X-Content-Type-Options "nosniff" always;
add_header Referrer-Policy "strict-origin-when-cross-origin" always;
add_header Permissions-Policy "geolocation=(), microphone=(), camera=()" always;

# Allow large uploads
client_max_body_size 2M;

location ~ ^/.*/$ {
	return 403;
}

# Block hidden files
location ~ /\.(?!well-known).* {
	deny all;
}

# Main routing
location / {
	try_files $uri $uri/ /index.php?$query_string;
}

# PHP handler
location ~ \.php$ {
	include snippets/fastcgi-php.conf;
	fastcgi_pass unix:/run/php/php8.3-fpm.sock;

	//  auth header
	fastcgi_param HTTP_AUTHORIZATION $http_authorization;

}

//  other settings
Cloudflare Layer
Cloudflare acts as the authenticated edge for the entire API surface in internet . Mutual TLS and Worker JWT validation creates a strong identity and authorization boundary before traffic ever touches your private API server.
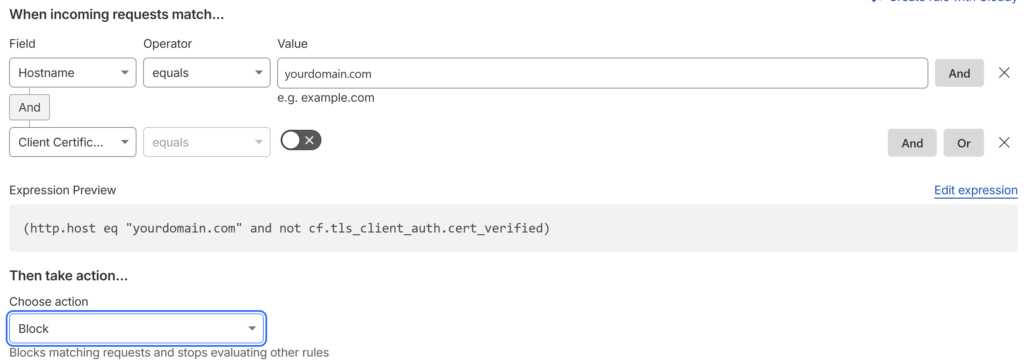
1. Mutual TLS — It is configured directly in the Cloudflare dashboard. In the SSL/TLS > Client Certificates section, create a new Client Certificate and download the certificate and private key. Embed this certificate into your mobile app. Cloudflare automatically manages the Client CA and validates every incoming request against it.

Than go to Security > Security rules > Custom rules and click Create rule to set up the logic to identify unverified traffic as follows:
2. Cloudflare Worker — It runs at the edge and validates the JWT before forwarding the request to your origin. The Worker checks the signature, issuer, audience, and expiration, and rejects any invalid or expired token. This ensures that only authenticated and authorized traffic reaches your private API server.
The JWT public key should be added as a “Secret” to the Workers > Settings > Variables > Secrets.
Cloudflare Worker JWT Validation Code Snippet
export default {
  async fetch(request, env) {
    const auth = request.headers.get("Authorization");
    if (!auth || !auth.startsWith("Bearer ")) {
      return new Response("Unauthorized", { status: 401 });
    }

    const token = auth.replace("Bearer ", "");

    try {
      // env.JWT_PUBLIC_KEY is the JWT public key
      const { payload } = await env.JWT.verify(token, env.JWT_PUBLIC_KEY, {
        issuer: "yourdomain.com",
        audience: "cloudflare"
      });

      // Token is valid → forward to origin
      return fetch(request);
    } catch (err) {
      return new Response("Invalid or expired token", { status: 401 });
    }
  }
};
Support components
Robust logging is essential for real‑time production monitoring. Logrotate handles local retention by deleting old logs right after rotation, while Fluent Bit streams the latest logs to CloudWatch, ensuring centralized, reliable observability.
Configure Logrotate
We use Logrotate to clear logs daily, reducing retention risk and minimizing the security exposure of sensitive operational data. To create a config file:
sudo nano /etc/logrotate.d/ec2-production add the Logrotate configuration
/var/log/yourdomain/*.log
/var/log/nginx/yourdomain.access.log
/var/log/nginx/yourdomain.error.log {
    daily
    missingok
    rotate 0        # This deletes the old log immediately after rotation
    notifempty
    copytruncate    # Clears the file content without changing the filename
    nocreate        # Do not create a new file; let the app handle it
}
Install Fluent Bit
Run these commands on your Ubuntu instance to install the stable version:
sudo wget -qO /etc/apt/keyrings/fluentbit.asc https://packages.fluentbit.io/fluentbit.key
echo "deb [signed-by=/etc/apt/keyrings/fluentbit.asc] https://packages.fluentbit.io/ubuntu/noble noble main" \
| sudo tee /etc/apt/sources.list.d/fluentbit.list

sudo apt update
sudo apt install -y fluent-bit
sudo systemctl start fluent-bit
sudo systemctl enable fluent-bit
systemctl status fluent-bit
Configure Fluent Bit to ship the logs to CloudWatch. Update /etc/fluent-bit/fluent-bit.conf to track these files.
[SERVICE]
    Flush        5
    Daemon       Off
    Log_Level    info
    Parsers_File parsers.conf

# 1. PHP Application Logs
[INPUT]
    Name             tail
    Path             /var/log/yourdomain/*.log
    Tag              ec2-production.php
    Refresh_Interval 5

# 2. Nginx Access Logs
[INPUT]
    Name             tail
    Path             /var/log/nginx/yourdomain.access.log
    Tag              ec2-production.nginx_access
    Parser           nginx  # Standard built-in parser for Nginx access
    Refresh_Interval 5

# 3. Nginx Error Logs
[INPUT]
    Name             tail
    Path             /var/log/nginx/yourdomain.error.log
    Tag              ec2-production.nginx_error
    # Nginx error logs often need a custom regex parser or 'multiline'
    Refresh_Interval 5

    Multiline        On
    Parser_Firstline nginx_error_firstline
    Parser_Nextline  nginx_error_nextline

[OUTPUT]
    Name            cloudwatch_logs
    Match           ec2-production.*
    region          aws-region
    log_group_name  ec2-production
    log_stream_prefix ec2-
    auto_create_group On
Restart the Fluent Bit
sudo systemctl restart fluent-bit Open the CloudWatch Console. Go to Logs > Log Groups. Look for the group name ec2-production. You should see log streams appearing within a few minutes of activity on your Nginx/PHP server.
Bastion Server
To minimize the attack surface, the production EC2 server remains inside the AWS private network with no public IP and no inbound rules, except controlled SSH access from a bastion host used for production support.
The bastion server
- Enabled only when production support is required
- Accessible only with an approved SSH key and trusted IP
- Access to production is performed exclusively through a controlled login script
- No production server private IPs or SSH keys are ever exposed
To add the production server controlled login script
# ensure the normal user can't read the production server key
sudo mkdir -p /root/keys
sudo mv /home/ubuntu/.ssh/ec2-production.pem /root/keys/
sudo chmod 600 /root/keys/ec2-production.pem

# login-ec2-production is the production server login script
sudo nano /usr/local/bin/login-ec2-production

# ensure normal can't update the login script
sudo chmod 700 /usr/local/bin/login-ec2-production
sudo chown root:root /usr/local/bin/login-ec2-production
add the permission to the normal user to run the script by “sudo visudo”
# add the permission
ubuntu ALL=(root) NOPASSWD: /usr/local/bin/login-ec2-production
We can go to the production server by login-ec2-production for production support without direct access.
Security Outcome
This layered setup ensures:
- Zero public exposure — no public IPs, all traffic enters through Cloudflare Tunnel only.
- Authenticated edge — Cloudflare enforces mTLS and validates JWTs before forwarding any request.
- No direct origin access — only Cloudflare Tunnel can reach the private API server.
- Strict request filtering — Nginx blocks unsafe patterns, malformed requests, and disallowed methods.
- Hardened runtime — PHP runs with disabled dangerous functions, strict session rules, and no version leakage.
- No stored passwords — API connects to RDS using IAM authentication, not static credentials.
- RDS Proxy only — EC2 instances cannot connect directly to the database.
- Identity at every hop — Cloudflare mTLS → Worker JWT → IAM role → RDS Proxy → RDS.
- East‑west segmentation — security groups restrict lateral movement between internal components.
- Minimal attack surface — no directory browsing, no file uploads, no sensitive files exposed.
- Consistent Zero‑Trust posture — every request, device, and connection must prove identity before being allowed through.
It’s a Zero Trust architecture applied to a legacy PHP system — without rewriting the application, without downtime, and without blowing the budget.
About the Author
Jonathan Wong is an IT and AI consultant with 20+ years of experience leading engineering teams across Vancouver and Hong Kong. He specializes in modernizing legacy platforms, cloud security, and building AI-ready systems for startups and large enterprises while advising leadership on using strategic technology to drive business growth.
Connect with me on LinkedIn
[…] I modernized my client’s platform security, the next strategic move was clear: elevate their product with generative AI. They wanted an […]
[…] Technical Deep Dive: How I Delivered Zero Trust Security for a Client’s Legacy PHP System Without … […]