

This section expands on the technical architecture and implementation behind my recent Zero Trust case study: How I Delivered Zero Trust Security for a Client’s Legacy PHP System — Without Rewrites, Downtime, or Big Costs – Behind the Build
Below is the high‑level architecture diagram:
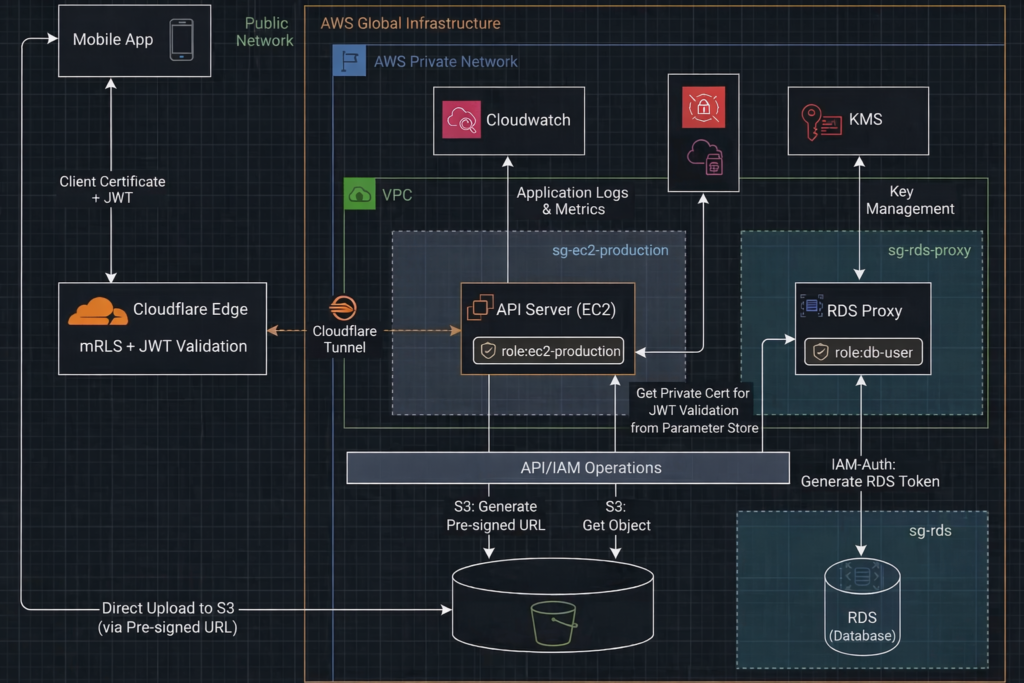
AWS Layer — Role‑Based Access + Network Isolation
The AWS environment is built around least privilege, no public exposure, and segmented trust boundaries. We enforce this through IAM roles, security groups, resource‑level permissions, and Cloudflare Tunnel.
Resources
1. EC2 (api-production) — API Server with No Public IP
This EC2 instance runs the PHP API and sits entirely inside a private subnet. It has no public IP, no inbound rules, and no exposed ports. The only way it communicates with the internet is through Cloudflare Tunnel.
Cloudflare Tunnel works because:
- The EC2 instance initiates an outbound TLS connection to Cloudflare
- Cloudflare never needs to reach into AWS
- No public IP, no inbound SG rules, and no NAT Gateway are required
This outbound‑only model eliminates the attack surface while still allowing global access.
Cloudflare Tunnel setup:
A. Install the cloudflared
curl -fsSL https://pkg.cloudflare.com/cloudflare-main.gpg \
| sudo tee /usr/share/keyrings/cloudflare.gpg >/dev/null

echo "deb [signed-by=/usr/share/keyrings/cloudflare.gpg] https://pkg.cloudflare.com/cloudflared jammy main" \
| sudo tee /etc/apt/sources.list.d/cloudflared.list

sudo apt update
sudo apt install cloudflared
B. Cloudflare Login and authentication. This command generates a one‑time login URL that authenticates your machine with Cloudflare and authorizes this cloudflared instance. During the process, Cloudflare downloads a “cert.pem” file, which the CLI uses later when creating and managing tunnels.
// Please log in to your Cloudflare dashboard before running the command below. Otherwise, you will be redirected to the Cloudflare login page and the authentication flow will not complete.

cloudflared tunnel login
C. Create Cloudflare tunnel. This command create Cloudflare tunnel, and returns a tunnel ID in the format xxxxxxxx-xxxx-xxxx-xxxx-xxxxxxxx1234
## Make sure to copy the tunnel ID for use in subsequent configuration steps
cloudflared tunnel create api-production-cf-tunnel E. Create tunnel DNS record. This command creates the DNS record for in Cloudflare. You should see a new ‘tunnel’ DNS record appear automatically in the Cloudflare dashboard. There is no need to manually add the record yourself.
cloudflared tunnel route dns api-production-cf-tunnel yourdomain.com with value xxxxxxxx-xxxx-xxxx-xxxx-xxxxxxxx1234.cfargotunnel.com D. Create tunnel runtime configurations
nano ~/.cloudflared/config.yaml The settings
tunnel: xxxxxxxx-xxxx-xxxx-xxxx-xxxxxxxx1234        # The tunnel ID returned by Cloudflare
credentials-file: /etc/cloudflared/xxxxxxxx-xxxx-xxxx-xxxx-xxxxxxxx1234.json  # Tunnel credentials

ingress:
  - hostname: yourdomain.com                        # Public hostname
    service: http://localhost:80                    # Local service to forward to
  - service: http_status:404                        # Default fallback
F. Start the Cloudflare tunnel
## save the configuration
sudo mkdir -p /etc/cloudflared
sudo mv ~/.cloudflared/config.yml /etc/cloudflared/
sudo mv ~/.cloudflared/*.json /etc/cloudflared/
sudo chown root:root /etc/cloudflared/config.yml
sudo chown root:root /etc/cloudflared/.json
sudo chmod 600 /etc/cloudflared/.json
sudo chmod 600 /etc/cloudflared/config.yml

## start the cloudflare tunnel in the api-production (EC2)
cloudflared tunnel run api-production-cf-tunnel
G. Install cloudflared as service
sudo cloudflared service install
sudo systemctl enable cloudflared
sudo systemctl start cloudflared
sudo systemctl status cloudflared
2. RDS (rds-production) — Private MySQL Database
The production database is fully isolated:
- No public access
- No internet routing
- IAM authentication only
- Encryption enabled
It can only be reached through the RDS Proxy.
3. RDS Proxy (rds-proxy-production) — IAM‑Authenticated Database Access
The proxy sits between the EC2 instance and the database. It enforces:
- IAM authentication
- Connection pooling
- No direct database exposure
IAM Roles
1. role-ec2-production — API Server Role
Attached to the EC2 instance. It grants access only to:
- Specific S3 buckets
- The RDS Proxy
- CloudWatch logs
No IAM users, no access keys, no long‑lived credentials. The inline policy:
role-ec2-production Inline Policy
//  RDS
{
  "Effect": "Allow",
  "Action": [
    "rds-db:connect"
  ],
  "Resource": [
    "arn:aws:rds-db:aws-region:aws-ac-id:dbuser:db-instance-arn/role-rds-db",
    "arn:aws:rds-db:aws-region:aws-ac-id:dbuser:prx-proxy-arn/role-rds-db"
  ]
}
//  S3
{
  "Sid": "AllowListBucket",
  "Effect": "Allow",
  "Action": "s3:ListBucket",
  "Resource": "arn:aws:s3:::bucket-name",
  "Condition": {
    "StringEquals": {
      "aws:RequestedRegion": "aws-region"
    }
  }
},
{
  "Sid": "AllowObjectReadWrite",
  "Effect": "Allow",
  "Action": [
    "s3:GetObject",
    "s3:PutObject"
  ],
  "Resource": "arn:aws:s3:::bucket-name/*",
  "Condition": {
    "StringEquals": {
      "aws:RequestedRegion": "aws-region"
    }
  }
}
//  CloudWatch
{
  "Effect": "Allow",
  "Action": [
    "logs:DescribeLogGroups",
    "logs:DescribeLogStreams",
    "logs:CreateLogGroup",
    "logs:CreateLogStream",
    "logs:PutLogEvents"
  ],
  "Resource": "*"
}
//  JWT
{
  "Sid": "AllowJWTPrivateKey",
  "Effect": "Allow",
  "Action": [
    "ssm:GetParameter",
    "ssm:GetParameters"
  ],
  "Resource": "arn:aws:ssm:aws-region:aws-ac-id:parameter/category-name/jwt/private-key"
}
2. role-rds-db — RDS Proxy Role
Attached to the RDS Proxy. It allows the proxy to authenticate to the database using IAM auth. Tokens are generated and signed by AWS KMS.
role-rds-db Inline policy
{
  "Sid": "GetSecretValue",
  "Action": [
    "secretsmanager:GetSecretValue"
  ],
  "Effect": "Allow",
  "Resource": [
    "arn:aws:secretsmanager:aws-region:aws-ac-id:secret:rds-proxy-role-rds-db-name"
  ]
}
{
  "Sid": "DecryptSecretValue",
  "Action": [
    "kms:Decrypt"
  ],
  "Effect": "Allow",
  "Resource": [
    "arn:aws:kms:aws-region:aws-ac-id:key/decrypt-key"
  ],
  "Condition": {
    "StringEquals": {
      "kms:ViaService": "secretsmanager.aws-region.amazonaws.com"
    }
  }
}
{
  "Effect": "Allow",
  "Action": "rds-db:connect",
  "Resource": "arn:aws:rds-db:aws-region:aws-ac-id:dbuser:db-name/role-rds-db"
}
3. role-rds-db — Database IAM Auth User
The same IAM auth username must exist inside the MySQL database. Creation SQL:
-- 1. Create IAM-authenticated user (no password)
CREATE USER 'role-rds-db'@'%' IDENTIFIED WITH AWSAuthenticationPlugin AS 'RDS';

-- 2. Grant only SELECT, INSERT, UPDATE, DELETE on the your_db database
GRANT SELECT, INSERT, UPDATE, DELETE ON your_db.* TO 'role-rds-db'@'%';

-- 3. Reload privileges (optional but safe)
FLUSH PRIVILEGES;
This ensures the proxy can authenticate as a database user without passwords.
Security Groups
1. sg-ec2-production
- Attached to the api-production
- No inbound access except from the bastion host via private IP
- Outbound allowed for Cloudflare Tunnel
This removes the external attack surface entirely.
2. sg-rds-proxy
- Attached to the RDS Proxy
- Only allows inbound 3306 from sg-ec2-production
3. sg-rds-db
- Attached to the RDS instance
- Only allows inbound 3306 from sg-rds-proxy
This ensures:
- EC2 cannot reach the database directly
- Only the proxy can communicate with the database
- Even inside the private network, lateral movement is blocked
API Server — PHP Layer
1. JWT validation and authorization in the PHP API before processing any request
- The PHP API verifies the JWT signature
- enforces expiration
- checks user permissions directly from the claims
Generate JWT Code Snippet
// your function

// -------------------------------
// 1. Load RSA private key from SSM
// -------------------------------

$ssm = new SsmClient([
	'region'  => 'aws-region',
	'version' => 'latest'
]);

$result = $ssm->getParameter([
	'Name' => '/category-name/jwt/private-key',   // <-- your parameter name
	'WithDecryption' => true
]);

$privateKeyPem = $result['Parameter']['Value'];

$privateKey = openssl_pkey_get_private($privateKeyPem);

if (!$privateKey) {

	//  error handling
}

// -------------------------------
// 2. Helper: Base64URL encoding
// -------------------------------

function base64UrlEncode($data) {
	return rtrim(strtr(base64_encode($data), '+/', '-_'), '=');
}

// -------------------------------
// 3. Build JWT header + payload
// -------------------------------

$header = [
	'alg' => 'RS256',
	'typ' => 'JWT'
];

$payload = [
	"sub" => $sub,  //  variable for later checking
	"iat" => time(),
	"exp" => time() + 360000,
	"iss" => "yourdomain.com",
	"aud" => "cloudflare"
];

$base64Header  = base64UrlEncode(json_encode($header, JSON_UNESCAPED_SLASHES));
$base64Payload = base64UrlEncode(json_encode($payload, JSON_UNESCAPED_SLASHES));

$dataToSign = "$base64Header.$base64Payload";

// -------------------------------
// 4. Sign with RSA private key
// -------------------------------

if (!openssl_sign($dataToSign, $signature, $privateKey, OPENSSL_ALGO_SHA256)) {

	//  error handling
}

$jwt = $dataToSign . "." . base64UrlEncode($signature);

// other function logic
Validate JWT Code Snippet
//  your function

list($h, $p, $s) = explode('.', $jwt);

$dataToVerify = "$h.$p";
$signature    = base64UrlDecode($s);

$publicKey = openssl_pkey_get_public(file_get_contents(your_jwt_public_key_path));

// validate signature
$valid = openssl_verify($dataToVerify, $signature, $publicKey, OPENSSL_ALGO_SHA256);

if ($valid !== 1) {

    // error handling

}

$payload = json_decode(base64UrlDecode($p), true);

// validate payload
if (!$payload || !isset($payload['exp'])) {

    // error handling

}

// validate expiry
if (time() <= $payload['exp']) {

    // error handling

}

//  your function other logic
2. Secure database access
- All database operations use PDO’s native parameter binding, which inherently prevents SQL injection.
- The connection enforces TLS encryption with the RDS CA bundle, ensuring data in transit is protected and the server identity is verified. The RDS CA bundle can be downloaded here
- Authentication is fully passwordless using IAM role–based RDS authentication, so no credentials are stored in the application.
- The PHP layer is restricted to connect exclusively through the RDS Proxy, never directly to the RDS instance, enforcing a strict Zero Trust boundary.
Database Connection Code Snippet
//  your function

$host = "proxy-xxxxxxxx"; // RDS Proxy endpoint
$port = 3306;
$username = "role-rds-db"; // MySQL user created with IDENTIFIED WITH AWSAuthenticationPlugin
$region = "aws-region";
$dbname = "your_db";

// AWS SDK
$sdk = new Sdk([
	'region'   => $region,
	'version'  => 'latest'
]);

$provider = CredentialProvider::defaultProvider();

$rdsAuthGenerator = new AuthTokenGenerator($provider);

// Generate IAM token (no password stored)
$token = $rdsAuthGenerator->createToken("$host:$port", $region, $username);

$dsn = "mysql:host=$host;port=$port;dbname=$dbname;charset=utf8mb4";

// Enforces TLS encryption with the RDS CA bundle
$ca_bundle_path = realpath($path_to_store_ . "/cert/global-bundle.pem");

$options = [
	PDO::ATTR_PERSISTENT         => false,					// Disable persistence in PDO
	PDO::ATTR_ERRMODE            => PDO::ERRMODE_EXCEPTION, // Throw exceptions on errors
	PDO::MYSQL_ATTR_SSL_CA       => $ca_bundle_path,       // Path to RDS CA bundle
//  other option settings
];

try {
	// 3. Establish the connection
	$pdo = new PDO($dsn, $username, $token, $options);

	return $pdo;

} catch (PDOException $e) {
	//  error handling
}

//  other function logic
3. No direct file handling on the server — The API never accepts file uploads. All file operations are performed through S3 pre‑signed URLs, ensuring the PHP layer remains stateless and free from file‑system exposure
S3 Upload / Read Code Snippet
//  your upload function

$bucket = 'your-bucket';
$region = 'aws-region';
$subFolder = 'your-subFolder';
//  $contentType as parameter

$s3 = new S3Client([
	'region'  => $region,
	'version' => 'latest'
]);

// Generate unique filename
$filename = random_str() . '.' . $ext;
$key = $subFolder . $filename;

// Create command for PUT
$cmd = $s3->getCommand('PutObject', [
	'Bucket' => $bucket,
	'Key'    => $key,
	'ContentType' => $contentType
]);

// Create pre-signed URL valid for 60 seconds
$request = $s3->createPresignedRequest($cmd, '+600 seconds');
$presignedUrl = (string) $request->getUri();

//  other function logic

//  your read function

    $bucket = 'your-bucket';
    $region = 'aws-region';
	//  $filepath  as parameter

    $s3 = new S3Client([
        'region'  => $region,
        'version' => 'latest'
    ]);

    // Create command for PUT
    $cmd = $s3->getCommand('GetObject', [
        'Bucket' => $bucket,
        'Key'    => $filepath
    ]);

    // Create pre-signed URL valid for 60 seconds
    $request = $s3->createPresignedRequest($cmd, '+600 seconds');
    $presignedUrl = (string) $request->getUri();

//  other function logic
4. php.ini Security Hardening — These php.ini changes lock down the PHP runtime by removing risk. The result is a minimal‑surface, production‑safe environment aligned with Zero Trust principles.
php.ini Setting Snippet
;;;;;;;;;;;;;;;;;;;;;;;;;;;;;;;;;;;;;;;;;;;;;;;;;;;;;;;;;;;;;;;;
; Disable Dangerous Functions
; Prevent command execution, file system abuse, and code injection
;;;;;;;;;;;;;;;;;;;;;;;;;;;;;;;;;;;;;;;;;;;;;;;;;;;;;;;;;;;;;;;;

disable_functions = exec,passthru,shell_exec,system,proc_open,popen,curl_multi_exec,parse_ini_file,show_source

;;;;;;;;;;;;;;;;;;;;;;;;;;;;;;;;;;;;;;;;;;;;;;;;;;;;;;;;;;;;;;;;
; Disable URL File Access
; Prevent Remote File Inclusion (RFI) attacks
;;;;;;;;;;;;;;;;;;;;;;;;;;;;;;;;;;;;;;;;;;;;;;;;;;;;;;;;;;;;;;;;

allow_url_fopen = Off
allow_url_include = Off

;;;;;;;;;;;;;;;;;;;;;;;;;;;;;;;;;;;;;;;;;;;;;;;;;;;;;;;;;;;;;;;;
; Hide PHP Version & Reduce Fingerprinting
;;;;;;;;;;;;;;;;;;;;;;;;;;;;;;;;;;;;;;;;;;;;;;;;;;;;;;;;;;;;;;;;

expose_php = Off

;;;;;;;;;;;;;;;;;;;;;;;;;;;;;;;;;;;;;;;;;;;;;;;;;;;;;;;;;;;;;;;;
; Session Security
; Protect against hijacking, fixation, and CSRF
;;;;;;;;;;;;;;;;;;;;;;;;;;;;;;;;;;;;;;;;;;;;;;;;;;;;;;;;;;;;;;;;

session.use_strict_mode = 1
session.use_only_cookies = 1
session.cookie_httponly = 1
session.cookie_secure = 1
session.cookie_samesite = Strict
session.use_trans_sid = 0
session.sid_length = 48
session.sid_bits_per_character = 6

;;;;;;;;;;;;;;;;;;;;;;;;;;;;;;;;;;;;;;;;;;;;;;;;;;;;;;;;;;;;;;;;
; Error Handling
; Never leak stack traces or internal paths to users
;;;;;;;;;;;;;;;;;;;;;;;;;;;;;;;;;;;;;;;;;;;;;;;;;;;;;;;;;;;;;;;;

display_errors = Off
display_startup_errors = Off
log_errors = On
error_log = path_to_log_folder/php_errors.log

;;;;;;;;;;;;;;;;;;;;;;;;;;;;;;;;;;;;;;;;;;;;;;;;;;;;;;;;;;;;;;;;
; Disable Legacy, Unsafe Features
; Prevent remote code injection via old PHP behaviors
;;;;;;;;;;;;;;;;;;;;;;;;;;;;;;;;;;;;;;;;;;;;;;;;;;;;;;;;;;;;;;;;

register_globals = Off
magic_quotes_gpc = Off
magic_quotes_runtime = Off
magic_quotes_sybase = Off
Security Outcome
This layered setup ensures:
- Zero public exposure — no public IPs, all traffic enters through Cloudflare Tunnel only.
- Authentication — JWTs are fully validated before any request is allowed to trigger the API.
- No direct origin access — only Cloudflare Tunnel can reach the private API server.
- No stored passwords — API connects to RDS using IAM authentication, not static credentials.
- RDS Proxy only — EC2 instances cannot connect directly to the database.
- Identity at every hop — IAM role → RDS Proxy → RDS.
- East‑west segmentation — security groups restrict lateral movement between internal components.
- Hardened runtime — PHP runs with disabled dangerous functions, strict session rules, and no version leakage.
- Minimal attack surface — no file uploads, no sensitive files exposed.
- Consistent Zero Trust posture — every request, device, and connection must prove identity before being allowed through.
What Next’s
This article focused on the AWS private‑network Zero Trust architecture I applied to a legacy PHP system — the part that happens inside the VPC, with no public exposure and identity‑driven access to every internal component.
In my next article, I’ll extend the story to the internet‑facing Zero Trust layer, covering how external traffic is authenticated, filtered, and isolated before it ever reaches the private network. That next piece will dive into:
- Cloudflare Edge and global identity enforcement
- Nginx request filtering and origin isolation
- Supporting operational components like CloudWatch and the bastion host
Together, these complete the full end‑to‑end Zero Trust posture — from the public internet all the way down to the private AWS runtime.
About the Author
Jonathan Wong is an IT and AI consultant with 20+ years of experience leading engineering teams across Vancouver and Hong Kong. He specializes in modernizing legacy platforms, cloud security, and building AI-ready systems for startups and large enterprises while advising leadership on using strategic technology to drive business growth.
Connect with me on LinkedIn
[…] System — Without Rewrites, Downtime, or Big Costs – Behind the Build, and extend the part 1 story to the internet‑facing Zero Trust layer, covering how external traffic is authenticated, […]
[…] Technical Deep Dive: How I Delivered Zero Trust Security for a Client’s Legacy PHP System Without … […]